")
My Top 6 Tips for Easily Inserting Zippers Next To Welt Cord
Bedding,DIY,Duvet Covers,Efficiency,how to videos,Pillow Shams,Sewing,Uncategorized,Workroom Tips,Workshops,Zippers
Tips for Inserting Zippers Next To Welt Cord Zippers [...]
Tips for Inserting Zippers Next To Welt Cord
Zippers next to welt cord. How are you inserting zippers next to welt cord in pillows, cushions, and bedding? Do you ever wonder if yours are sewn well enough? Do you ever struggle with the size or type of zipper you should use? In this blog, we’ll focus on two types of zippers next to the welt cord: regular zippers and invisible zippers. Once you get the hang of inserting these, you’ll be zipping along with no trouble. Let me help build your confidence so you can build your sewing skills.
Regular zippers next to welt cord
This may sound like a no-brainer because many of you are comfortable inserting regular zippers next to welt cords in pillows. The tip I’d like to share with you is the size of the flap you use to cover the zipper. This flap should not be so large as to cover the welt cord. And it shouldn’t be so small that the zipper shows. The flap should touch the welt cord. You may need to play around with the flap size based on the fabric weight, the size of the welt cord, or how full you fill the pillow.
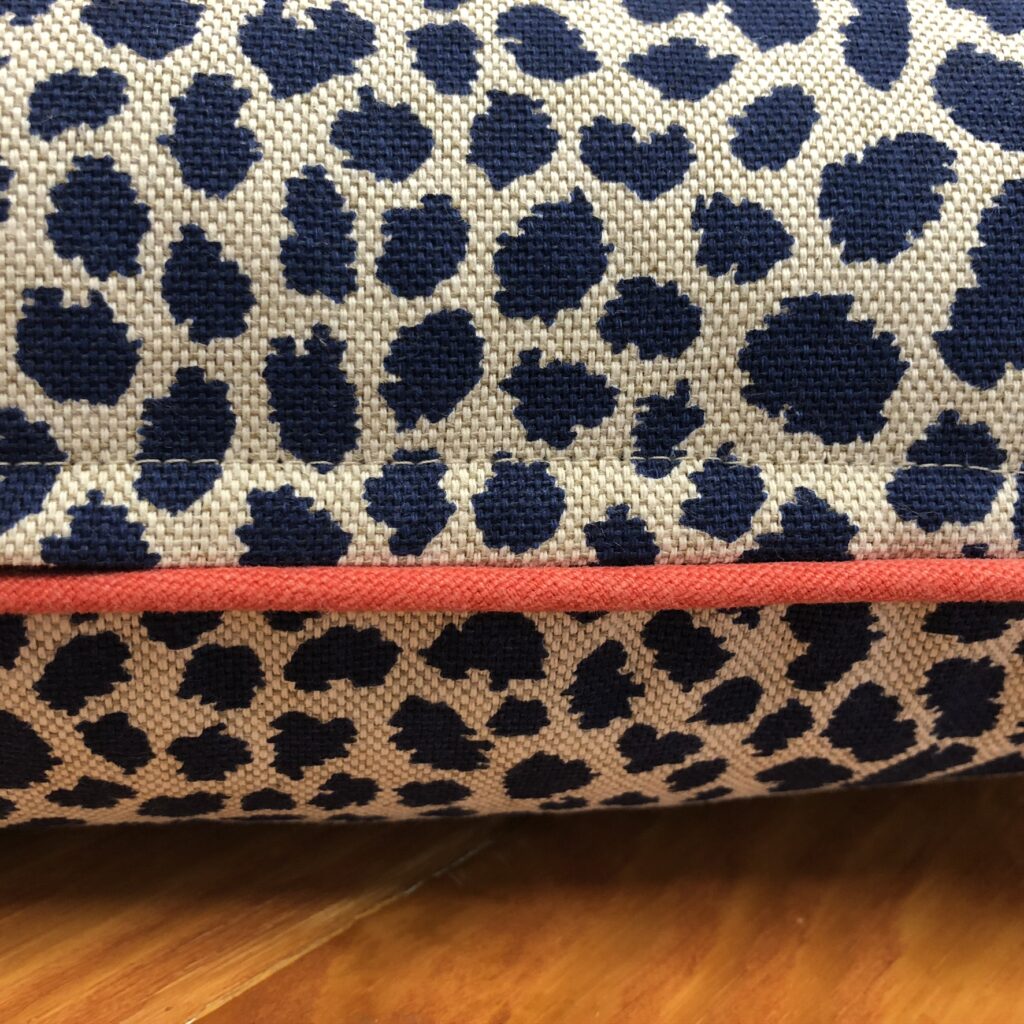
The flap covering the zipper touches the welt cord. Isn’t this pretty?

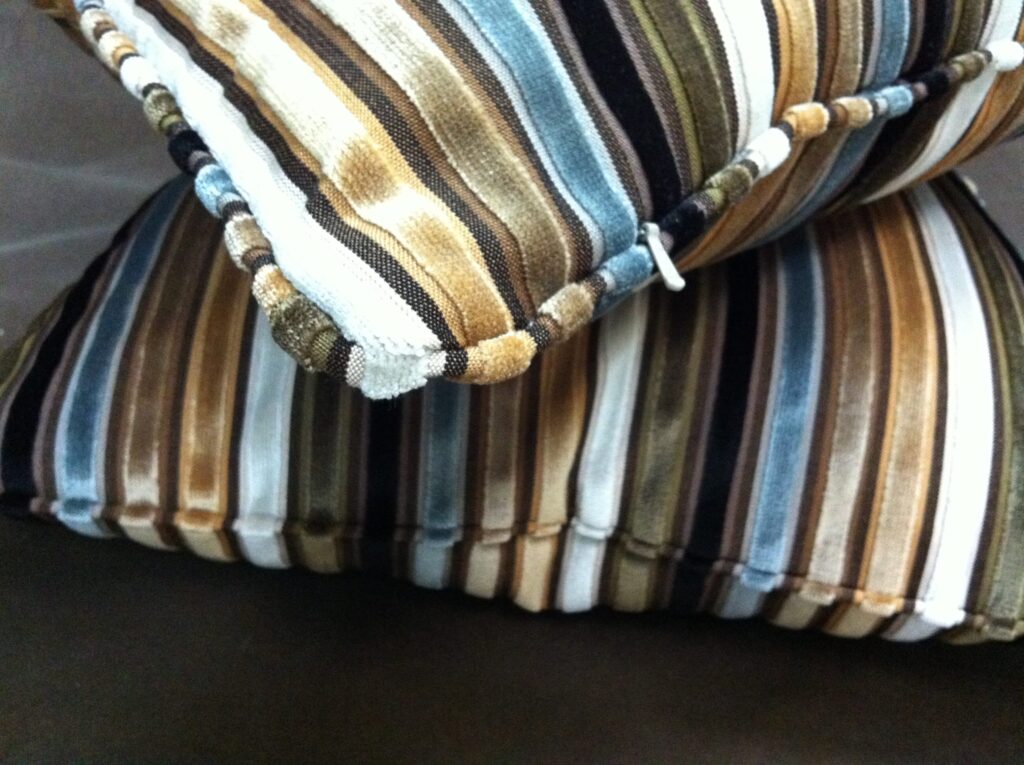
Here’s another pillow showing the flap just touching the welt cord. Since this was faux leather, the sewing technique had to be correct the first time. Sew slowly and carefully!
Invisible zippers next to welt cord
How are you doing sewing zippers next to welt cord? Based on the number of calls, emails, and requests I receive from you, this is a zipper technique many of you are fearful of and want more assistance with. Let me share a few tips on this technique to help you.
Tip #1
It is possible to sew too close to the invisible zipper teeth. When this happens, it will be difficult to open and close the invisible zipper. If you accidentally sew over the teeth of an invisible zipper, it won’t work, so it’s best to start over with a new zipper.
Tip #2
When sewing an invisible zipper next to welt cord, a drapery-weight fabric, an invisible zipper size #3 works well. However, for heavier fabrics or when using lining and interlining in your pillow projects, moving up to an invisible zipper #5 is a good idea. This is due to the turn of the cloth. The heavier the fabric, the larger the turn of the cloth will be, which will then bump into the zipper teeth, making it difficult to open and close the zipper. Lastly, you’ll want to use invisible zippers for home decor use. Zippers for the clothing industry are not intended for home decor use.

This photo shows the comparison between a size #5 and size #3 invisible zipper and the size of the zipper pulls. I like to consider the size of the pulls because, in a well-sewn invisible zipper next to the welt cord, the only thing that shows is the zipper pull.
Tip #3
When you sew an invisible zipper next to welt cord, the cord is sewn to the pillow first, of course. Be sure the seam join of the welt cord or the decorative braid cord is not along the edge of the pillow or cushion where the zipper is sewn. As a habit, I always place this join in the lower-right corner of the project.
Tip #4
I’ve saved this tip for last because I want to be sure you remember this one. And this is your pass to freedom. It’s almost impossible for the invisible zipper to be right up to the welt cord. But this is okay. The welt cord will cover this once the project is completed. Really, it is.

Invisible zipper next to welt cord. The only thing that shows is the zipper pull.
Practice makes perfect, or almost any way! Once you master inserting zippers next to welt cord, you’ll become comfortable and skilled enough to insert invisible zippers into pillows and match your stripes too. Really, you will.
Tip #5
Are you a visual learner? Look at this YouTube video I made to see how I like to insert an invisible zipper next to the welt cord. Watch the video to get the idea. Then, you can start and stop the video as you sew your invisible zipper next to the welt cord. Watch the video here.
For more online information on adding zippers to your projects, check out my on-demand Easy Zippers Video Course, which includes 6 video tutorials for different types of zippers for you to try in the comfort of your own home. Start and stop the video as you sew along with Donna.
Tip #6
Are you a hands-on, watch-the-instructor kind of learner? Be sure to watch for my next Zipper Techniques, hands-on workshop coming up soon. If you want to be on the dates for this workshop, be sure to Email me
Practice sewing zippers in your projects, and let me know how you are progressing. And if you have any questions, let me know. I’d love to help you!
You’ve just learned a few of my go-to zipper tips—but this is only the beginning. Inside the Designs by Donna Membership, I teach these techniques in full, step-by-step lessons, along with advanced pillow and bedding construction methods you won’t find on the blog.
More than that, this is a place to slow down, sew with intention, and build skills without the pressure to rush or figure everything out on your own. You’ll be surrounded by a supportive community of makers who value thoughtful learning, creativity, and well-being—right alongside beautiful results.
With live weekly Q&A sessions and ongoing guidance, your questions are met with clarity and care. If you’re ready to grow your skills in a way that feels sustainable and encouraging, this is where we sew together.
Many members say the community alone is what finally helped everything “click.”
Click here to Explore the Membership
Sew with intention. Learn with confidence. And remember—you don’t have to figure this out alone.
If you know someone who would benefit from reading this, please share it with them. Thanks!
Share this article

Meet Donna Cash – Your Trusted Sewing Mentor & Creative Guide
Donna Cash is the founder of Designs by Donna, an award-winning drapery and soft furnishings studio known for its exquisite custom pillows, bedding, drapery, and detailed embellishments. With over 30 years of hands-on experience, Donna brings a rare blend of technical expertise, artistic flair, and warm encouragement to every maker she mentors.
A passionate educator, speaker, and industry leader, Donna has trained hundreds of DIYers and professionals alike, helping them master professional techniques while cultivating a calm, joyful, and balanced approach to their craft. Whether you're just beginning your sewing journey or running a workroom business, Donna is here to help you grow with confidence.
Through her blog, video tutorials, and vibrant online membership community, she shares time-saving strategies, fabric insights, and real-world solutions that make high-quality results feel achievable—and enjoyable. Donna’s mission is simple but powerful: to help you create beautiful things with fabric, one inspired stitch at a time.
Join the community and explore expert instruction at www.designsbydonna.com.
Related Posts
Follow me
Latest articles
June 23, 2026

June 23, 2026